Posts mit dem Label Tutorial werden angezeigt. Alle Posts anzeigen

Dienstag, 7. August 2012

Tutorial: John Galliano Autumn/Winter 2012/13

One of my favorite looks from the last issue of the In Beauty, was the one from John Galliano for Autumn/Winter 2012/13.

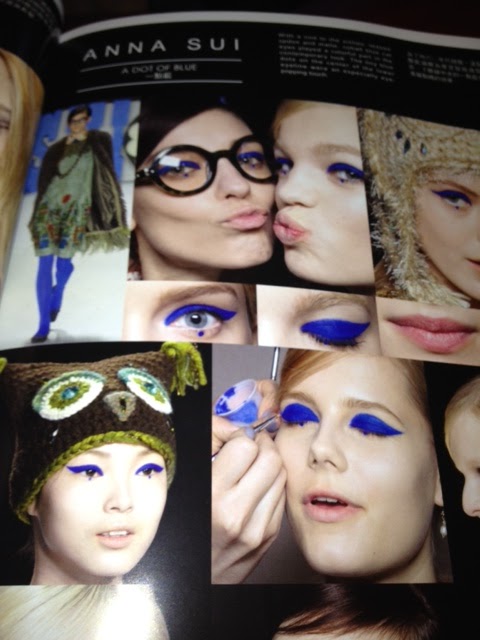
It was a black smokey eyes with a peacock shimmering blueish-greenish color on top. Therefor a lot of black kohl pencil was used.

For my version I changed the black with a brown color to give the look a softer note and make it more wearable for daylight (of course as always, it depends where you work).


You can even let the black kohl pencil out, if it's to dark for you. Exchange it with a brown one. Or if you want more drama, add the black kohl pencil to your waterline. I didn't because I got dry eyes and putting something on the waterline make them even more dry. 

Tip: But you can add some color into the inner corner to get also a quite good dramatic effect.


Start with a black line (Maybelline Expression Kohl Pencil)

smudge it with a pencil brush into the lashline...
... and a little bit into the inner corner

use the leftover on the brush for the lower lash

Add a brown cream color on the lid and blend it
I used MAC Paint Pot Constructivist for it, my all time favorite
... also a little bit of the brown color under the eye and blend it with the black
add some highlighter under your brow and in the inner corner
I used here MAC Blanc Type

Time for shimmer!
Add some shimmery eye shadow on top in the middle and
blend it to the sides and upwards
(e.g. MAC Pigments Blue Brown which is actually more green than blue)

I also added some bright white-blue shimmer in the middle
(Sugarpill's Lumi Loose)

Brush your brows! If necessary add some brow powder.
Mascara! I used here a blue one to achieve a more luminous look
(ByTerry Mascara)


Not enough shimmer for today?
OPI Just Spotted the Lizzard
the pic is very pale... it's a green-blue-golden color
looks more like a shimmering dogbane beetle


Donnerstag, 2. August 2012

How to make your own Colored Mascara

Found on You Tube... this is a really great tip how to make your own colored mascara.
Besides upcoming Street Parades, Love Parade, Summer Festivals...
How many opportunities do you have to wear colored mascara anyway? And when you want to use it again the product is old and dried out.
So check this tutorial from Nikkietutorials.com out:

Sonntag, 29. Juli 2012

Tutorial: Talbot Runhof Autumn/Winter 2012/13


One of my favorite looks from the last issue of the In Beauty, was the one from Talbot Runhof.

Instead of doing a cat eye with a wing they emphasize the crease with another line to create more deep and expression to the look.


They used a lime green color for this. In my version I used a coffee-brown kohl pencil.

I can imagine that this style would also look good with a blue, purple or bordeaux color.

Sorry for "creepy lenses". 

I run out of the neutral ones. 

And now to my version of the runway look:


start as always with a primer (e.g. MAC Paints)

put some matte fair brown eyeshadow on the lid
(e.g. MAC Omega)

draw a line with a kohl pencil
it's easier to use the kohl pencil instead of a liquid liner
because you can correct more easily (MAC coffee)
draw a second line along your crease of the eye
Tip: the pencil will more glide if you keep turning it

put some of the fair brown eyeshadow over it to fix it
blend a little bit of the eyeshadow over your crease up
to the eyebrows

since I was not satisfied with the effect on the lash line
I gave some black liquid eyeliner over it
just a fine line (Lime Crime)
blend the black line into the brown line with a fine brush

some cream eyeliner for the water line (Isadora Inliner)
and a little bit of the brown kohl pencil exact on the under lashes
(make some small points)
Mascara! (MaxFaktor 2000 kcal)
Highlighter in the inner corner and on the highest spot under
your brown, then blend it (e.g. MAC Blanc Type)

Done! :-)


Freitag, 13. Juli 2012

Tutorial Anna Sui

I've already showed you my favorites of the new In Beauty and promised to do some tutorials and to make my own version - from runway to ready-to-wear:

Let's start with Anna Sui's runway look for autumn/winter 2012/2013:

It's a very strong and bright blue color, it's not only an eyeliner, the whole lid was filled with the opaque color. The focus was on the upper lid, so no mascara or color under the eye beside a little blue point in the middle of the eye.

Tip: blue doesn't like red undertones, so be sure to use a good foundation and concealer to cover up spots or red marks. Don't use a red toned blush, I just used some (pale) bronzer to complete this look.

... and here's my version:

start with a primer (I used Mac Paints Bare Study)
and a white kohl pencil for the water line (IsaDora Inliner)

If you find it hard to draw a symmetric line, start with a
white line first and then fill it out.
You can easily correct the white line with a q-tipp.
See also tutorial here.

Fill out the white line with a blue eyeliner (Lime Crime's Lazuli)
For more depth go over with a black eyeliner
be sure to wait long enough until the blue color is dry

clean the white line if something's left
go with some brown shimmer into the crease and blend
it up to the eye brown for more definition
(Bobbi Brown shimmer brick)

For more definition under the eye use a matte brown eye shadow
and blend it upwards to the wing
Don't forget the little point!
I marked it in the inner corner because under the eye it looks like a teardrop
And because I used mascara on the under lashes it won't be seen well anyway.
Mascara, eye brown and ready!


Samstag, 5. Mai 2012

Tutorial: Holly Golightly

Since I've seen the movie Breakfast At Tiffany's lately, I went nuts to get the sunglasses "Manhattan" from Oliver Goldsmith.

They are just perfect: big, black and classy.


If you have old Ray Bans or similar ones, here's a DIY form P.S.-I made this to get cat eye sunglasses.
Meow!


And here's my tutorial for eyes like Holly Golightly!


start with eye primer
e.g. MAC Paints Bare Study
on the whole lid a beige tone and a little bit under the eye
e.g. MAC Quarry
If you don't wont to go with brown shades of course you can use grey tones as well
mark with a white liner where you want your black line
find tutorial here
give your eyes deep with a darker shade
in the crease and 1/3 under the eye
e.g. MAC Handwritten
start to fill in the white line with a black liquid eyeliner
apply white eyeliner on the waterline
apply mascara or fake lashes
Holly has only mascara on the upper lashes
but that doesn't suit me, so I did both
get your brows in shape, if you have thin one try to make them bold
I did this with a darker shadow at the end of the brow (1/3)
and a mid-tone for the last 2/3
add some highlighter under the brows
done! I applied a little bit more dark brown in the corners
to receive bigger looking eyes
no worries about the thin white line, you won't see it from far
and it gives your line a 3D-effect
if you don't like it, you can easily blend it with a clean brush or a q-tip

for my lips I used Laura Mercier Lip Glacé Rose
a hint of blush: Benefit Cosmetics Benetint Mango 
and now... let's have breakfast at Tiffany's ;-)